Tips

Refreshing a Room by Rotating Works of Art

Refreshing a Room by Rotating Works of Art

Each year, we decorate our homes and offices during a season or holiday with festive decorations to celebrate that season or holiday. It’s nice to see our environment in a different light every once in a while. It’s fun and creates excitement. However, it’s not the only way to shake up the monotony of our everyday surroundings. It’s also good practice to rotate your wall art in each room every once in a while to create a new, refreshing look.

While rotating your artwork can include incorporating new artwork into your art collection, it does not necessarily mean entirely getting rid of old artwork. It simply means moving pieces around, possibly into different rooms with a different combination of pieces. It could mean storing a piece temporarily for a season or two while something new hangs in its place. Or, yes, it really could mean retiring an artwork entirely.

Refreshing a Room by Rotating Works of Art

The point is to refresh a space that has looked the same for a period of time, change has to occur, and rotating artwork within your home or office space may be something that you never thought about before. It also gets rid of the excuse that you can’t buy new art because you don’t have the wall space for it.

Posted by Dawn Wayand in Tips, 0 comments
How To Choose the Perfect Size Artwork for Your Living Space

How To Choose the Perfect Size Artwork for Your Living Space

Acquiring a new piece of art can be exciting but it can also be a bit challenging as there are so many things to consider such as different styles, and color coordination with your existing decor, not to mention your budget. However, it’s also easy to overlook the importance of considering the size of a piece of artwork for your living space.

Best Size Artwork - Dawn M. Wayand

Too small artwork can make a room feel “off”, and too large can make a room feel overcrowded.


Too large of a canvas and your room can feel a bit crowded, while too small can make a room feel “off”. Artwork with the right dimensions and orientation can really tie a room together. If you’re ready to buy but unsure where to start, I’ve put together a few simple guidelines to get you going in the right direction.


Orientation

If you have a narrow strip of wall space between two windows, between two doors, or between a window and a corner or a doorway and a corner that yearns for something other than wall paint on it, consider a portrait-oriented (vertical) artwork. This will create a sense of height in the room.

Orientation - Portrait-Oriented - After the Rain I - Dawn M. Wayand

After the Rain I (24×36”)


If you have a broader, vast, wall space to hang a piece, then either go for a landscape-oriented (horizontal) artwork or a series of portrait-oriented artworks hung next to each other that work together. This will fill the field of view.

Orientation - Landscape-Oriented - Sunflowers Triptych I - Dawn M. Wayand

Sunflowers Triptych I (16×40”, 30×40”, 16×40”)


Size

When determining the size of a piece of art to hang, aim for a piece that fills two-thirds (0.666) to three-fourths (0.75) of the available wall space. The same proportions apply when hanging your artwork over furniture such as a dresser, a sofa, or a headboard but you will be using your furniture more as your guide for sizing the artwork. Look for artwork with a width that is two-thirds to three-fourths the width of the furniture. For instance, if your sofa is 80 inches wide, try to find a work approximately 53-60 inches wide.

Size - Large Artwork - Music in My Dreams - Dawn M. Wayand

Music in My Dreams (48×24”)


One large piece of art isn’t always feasible or within the budget. For larger wall spaces you can hang a series of artworks side by side using the same width allotment you would’ve used for a larger piece. Just add up the width of each artwork and the space needed between them and make sure it still equals the necessary two-thirds to three-fourths width of space you are aiming for.

Size - Multiple Portrait-Oriented - Hidden Treasures I & II - Dawn M. Wayand

Hidden Treasures I & II (20×24” each)


Placement

Generally, artworks are hung at eye level with the “center” of the piece approximately 65-70 inches above the floor. When hanging artwork above a dresser, sofa, or headboard, it’s best to leave 6-12 inches between the bottom of the artwork and the top of the furniture. Heat can destroy artworks over time so I do not recommend hanging a valuable piece over a fireplace, however, I would recommend hanging a mirror or some other form of decoration 4-6 inches over a fireplace mantel for the best look.

Placement - Chaos I - Dawn M. Wayand

Chaos I (36×24”)


So now that you have a better idea about size, orientation, and placement to go with your existing ideas of colors, styles, and budget, it’s time to go buy some artwork for those walls! Keep in mind these are just guidelines to help make your rooms look balanced. If you’re slightly off with measurements but the artwork really speaks to you, go for it and make it work for you! 


Posted by Dawn Wayand in Tips, 0 comments
Finding Inspiration for Art

Finding Inspiration for Art

Artists sometimes face an interlude in creating new art or continuing existing works due to a “creative block”. They may find it difficult to conjure up a new idea or finish an artwork they’ve already started. As an artist, you may feel like you’ve painted everything you enjoy painting or you’re not even motivated to pick up your paintbrush anymore because you’re fresh out of ideas on what to paint. 

Mixing real life with canvas.


When this happens, it can feel like the end of your world (or at the very least, your art career), but there is actually is hope! Below are 10 tips that have worked for me in the past to help overcome a creative block and to help get you back on track to create new and more amazing artworks.


  1. Assign Yourself an Art Project. There are a variety of books as well as articles on the web that are dedicated to daily, weekly, and monthly art project ideas to aid artists in getting their creative juices flowing again. 

A few recommended art project books.


     A few book examples are:


  1. Paint the Same Subject 10 Different Ways. I am also a photographer, and one exercise that has helped me wriggle out of a creative block has been giving myself a time limit and shooting the same subject 100 different ways. However, canvas can be expensive and with the time it takes to paint a work of art, you may have broken your creative block well before painting #100. Restrict yourself to one subject and paint that same subject 10 different ways. Think different angles and perspectives, sizes, crop in close, etc. Try different mediums and textures.


  1. Paint Anything. Prepare your canvas and paint any subject, even if it doesn’t interest you. Paint a still life of things from your home. As long as you are painting something, you are getting your juices flowing and this is a great first step on the road to recovery.


  1. Experiment with new media. Break out your camera and shoot something that catches your eye. Then try drawing or painting one of your photographs. I very often will take my charcoal pencils out and draw one of my photographs. 

My photograph of the pelican on the pier (left) and my drawing from that photograph (right).


Even if you feel like you’re not much of a photographer, attempting to draw or paint a still object or scene from a photograph is a great way to try to beat a creative block.

My photograph of a scene in Eze, France (left) and my drawing from that photograph (right).


Flirting with other art mediums can not only assist in getting the creative juices flowing again, but you may find you like practicing in a new type of art!


  1. Don’t Limit Yourself To Just One Media on Canvas. I found my art world opened up when I started incorporating objects onto my canvases such as dried flowers, faux butterflies, actual musical instrument parts, etc. It not only made my works more 3-dimensional, but it gave me a niche. Artwork doesn’t have to always be 2-dimensional. Sometimes letting the artwork flow out of the canvas and come alive also helps with creative inspiration.

Incorporating actual guitar parts onto the canvas for a 3-D feel.


  1. Study the Great Masters and Try to Emulate Their Work Adding Your Own Twist. Research the great masters of art in your area of interest and study their works as well as other artists’ works. Try painting in their style and form, possibly even try to replicate one of their paintings, but adding your own twist. By emulating the works of artists that are of interest to you, you find yourself newly inspired and developing and/or practicing new techniques that you didn’t know before.


  1. Look To Magazines, Books, and Other Media for Inspiration. Along the lines of studying the masters and other artists’ works, look through your favorite magazines for inspiration and new ideas. Other forms of art can also be just as inspiring and motivating to cause a boost in your creative juices. Things such as a good song, a movie, a tv show, a work of art or even a good book can help generate new ideas for things such as still life portraits, scenic paintings, a new painting technique, and much more.


  1. Start an Art Journal. An art journal can be a great tool for artists to get the creative juices flowing. Keeping a small notebook with you at all times can come in handy for jotting down that fleeting idea that you might have during the day (or night) that you may forget after 10 minutes otherwise. Art journals can also serve as a place to create sketches of ideas you may have for paintings.

An art journal can be a great tool and record to save you when you go through those times of a creative block.


An art journal can serve as a record of your thoughts and ideas – something you can refer back to during those times when you might have a creative block.


  1. Take an Art Class. There’s nothing more motivating to get you painting again than to take an art class. Taking a class can force you to paint, learn new techniques, and share different visions with fellow art students. An art class also forces you to produce work in a more structured environment. You might find that the exercises and assignments that an art instructor might give you help to open that creative door again.


  1. Have patience. Creative blocks are not the end of the world. They are just a small bump in the road to becoming a better, more creative artist. Creative blocks can provide you with opportunities to look at other works and try new techniques granting you continued education, practice, and production. Have patience. Don’t look at a creative block as an obstacle, but as part of the creative journey.
Posted by Dawn Wayand in Tips, 0 comments
Best Practices for Safely Preparing Artwork for Storage Until It’s Sold

Best Practices for Safely Preparing Artwork for Storage Until It’s Sold

I recently had an explosion of creativity over the last 18 months and an urge to get it all out on canvas, however, I was painting faster than I had been selling my work. Living in a small one-bedroom apartment just outside New York City, I had to find a solution for storing my work until it sold so I rented a public storage unit. 

One may gasp at the thought of placing your valuable art in a potentially hazardous space where it could not only be stolen but suffer from mold, mildew, or rodent damage. However, there are many precautions that can be taken to help ensure your precious works of art do not fall victim to these circumstances. In this article, I will provide you with some of the best practices for safely preparing artwork for storage until it’s sold.


Preparing the Artwork

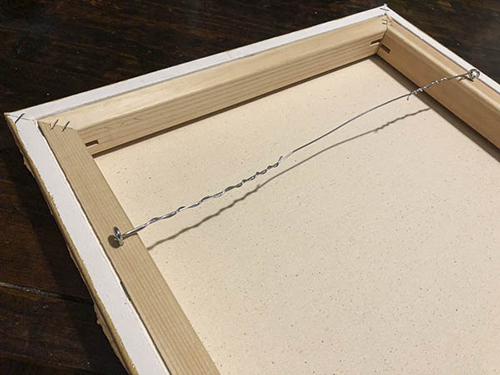
First, I typically like to make sure my art is ready to hang for the customer, so I will make sure that I have added the screw eyes to the back of the canvas and threaded the artwork with wire to make this possible.

Canvas wired for hanging


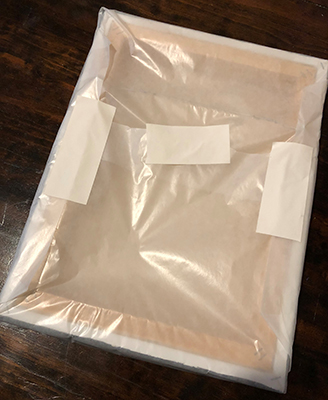
Next, I’ll wrap the artwork in glassine paper and use either a white gaffer tape or masking tape to secure the closure of the wrapping. I don’t use saran wrap or bubble wrap because plastics can invite moisture under the right temperatures, which can lead to mold and mildew. 

Gaffers tape to secure glassine paper


Packing the Artwork

While I’m all about recycling, I recommend using new boxes for storing valuable artwork instead of recycled boxes. My reasoning for this is that boxes that have already been used for things such as shipping have experienced the elements of the outdoors which can cause mold and mildew. For instance, a box may have sat on a semi-moist doorstep and then dried 99%, have had little ants crawled into the crevices of the corrugated cardboard, or the box itself may be worn, slightly dirty – any of these things could be potentially hazardous. Do you really want to take a risk?

Packing the artwork with packing paper


At the same time, I’ll use fresh packing paper to pack the artwork in the box securely so it doesn’t slide around during transit or during shipping once I sell it since I don’t plan to open the package again. Again, I don’t use bubble wrap or plastics because those can invite mold and mildew under the right temperatures.


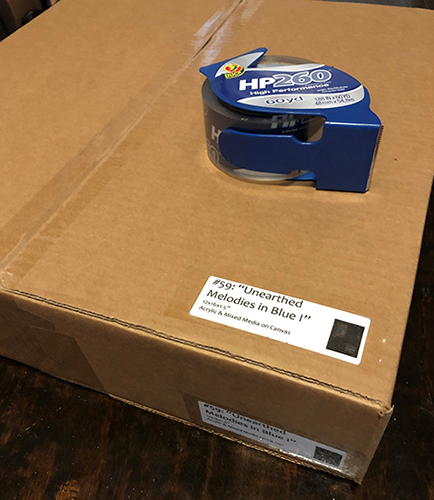
Once I’ve sealed the box closed, I’ll affix a label to three different sides of the box that includes a photo of the artwork as well as the inventory number, title, dimensions, and medium of the artwork. I affix a label to three sides of the box as, while I’m very organized, plans may change once I get the artwork to the storage unit and I’m not entirely sure how I will set up my box layout once I get there. I want to make sure that my label on each box is visible so that I can easily retrieve any piece of art once I sell it instead of having to move boxes around to find what I need.

Labeling the box


The Storage Unit

First of all, get insurance. Most storage rental spaces will only offer insurance up to $5,000 or less for a fee per month, which for many of us, is useless. Check with your renter’s or homeowner’s insurance company to add the value of your artwork you are storing in storage to your policy (yes, this is possible). You’ll be surprised that it may only raise your premium by $5-10/month (if anything at all) depending on the value of your artwork.

Second, make sure your artwork is stored in a climate-controlled storage unit. If not, you invite humidity in the summers and cold dampness in the winters and everything else in between.

Next, inspect the storage facility before renting and ask about pest control services. Do they exterminate regularly? You don’t want rodents making a home in your boxed artwork.

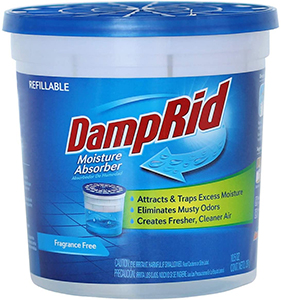
Last, most insurance policies do not protect against mold or mildew so your best defense for these are the steps I’ve provided above plus depending on the size of your storage unit, including a moisture absorber product or two (some storage rental places sell these) and changing them out every six months or as directed on the package.

Moisture absorber


Keep an inventory of the artwork you have in storage not only for business purposes but for insurance purposes.

I hope this article was useful to artists out there who have wondered how to store their artwork. Feel free to leave a comment below if you’d like to add anything or have a question.


Posted by Dawn Wayand in Tips, 0 comments